Welcome to the world of imagination.
Showing posts with label Tutorials. Show all posts

Thursday, July 30, 2009

Vanishing Point


In this tutorials, I will show you how you can make use of Vanishing Point feature of Photoshop. By this you can apply your picture to any buildings, walls, bedsheets & much more other things.
You need these two pictures of wall & starsburst for this. You can also use your own images for this.

Step-1: Open the Wall and starburst picture in photoshop, select starburst all picture by pressing ctrl+A & copy it by ctrl+c. We'll use it later.

Step-2: Come to our image of wall, go to Layer > New > Layer and the new layer is created & named it vanish.


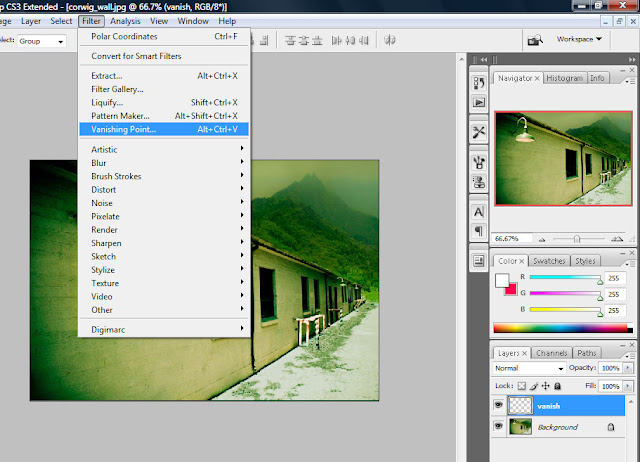
Step-3: Now by selecting vanish layer, go to Filter > Vanishing Point or press Alt+Ctrl+V.


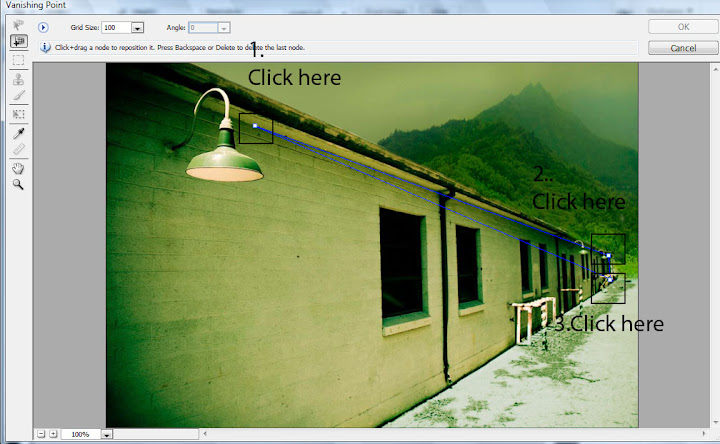
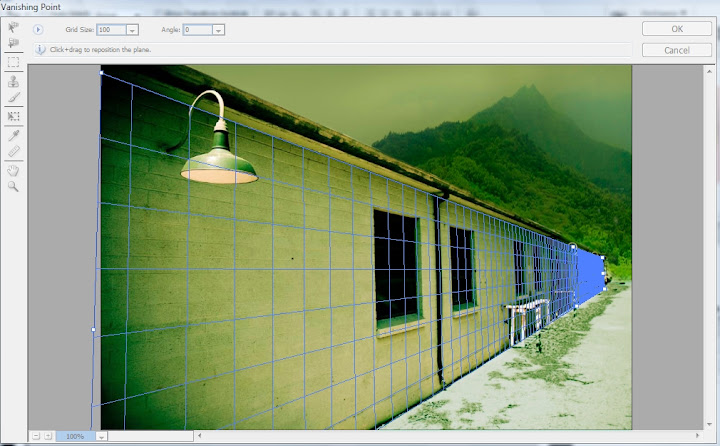
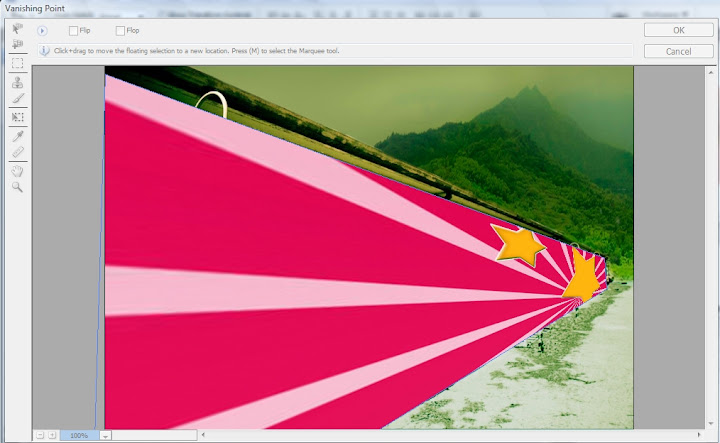
The vanishing point window will be open, by using Create Plane tool start to select the wall area on which you want to set your picture as shown. when you click third time than it automaticaly connected to first point.


Now by click 4th time than it display the vanishing area
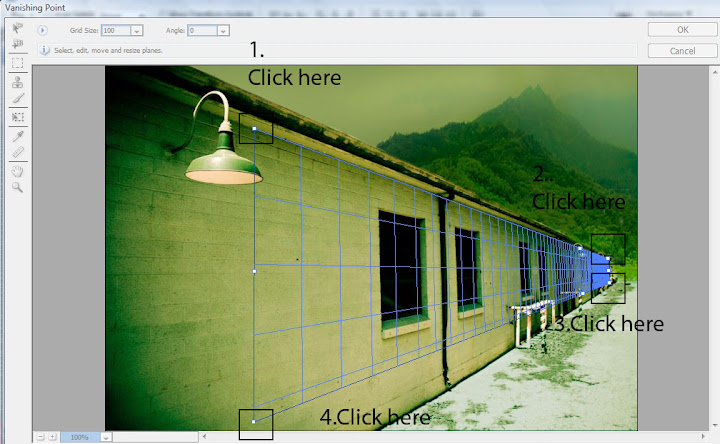


& change its size to show propely on wall as


Its time to paste our Starburst picture here, that we'r copy earlier.
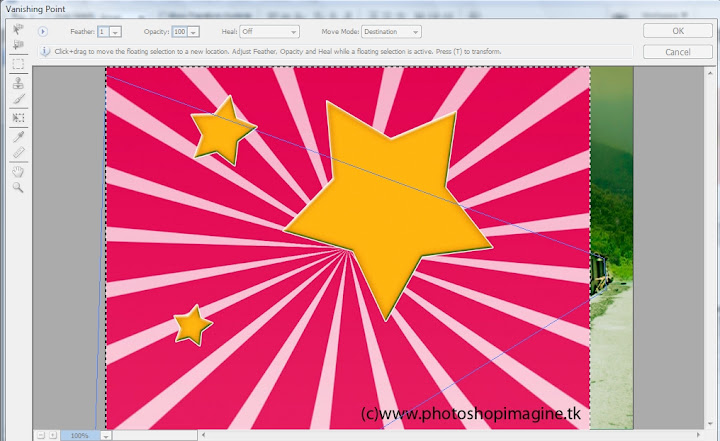


Now we'r using just simply drag n drop technique, using mouse drag it to the vanishing area as shown in picture
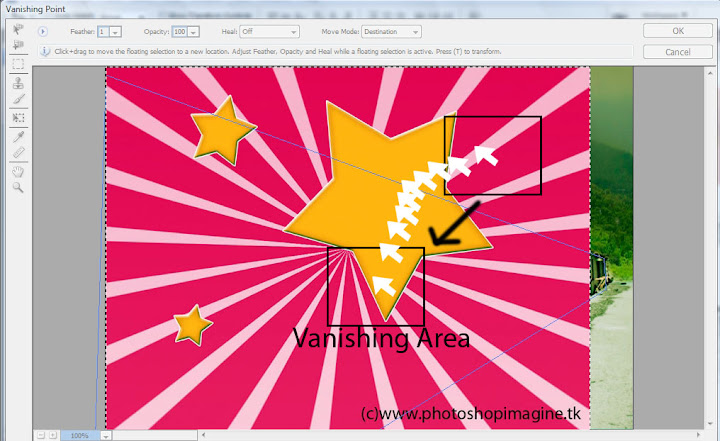


its appear as
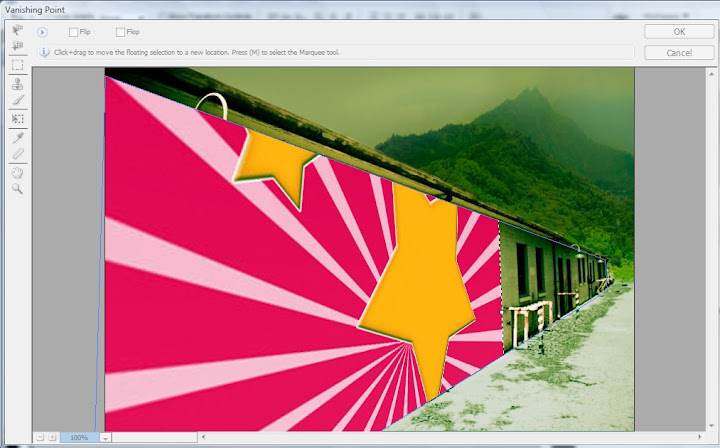


Now press Ctrl+T for adjust its size to properly shown to the wall.


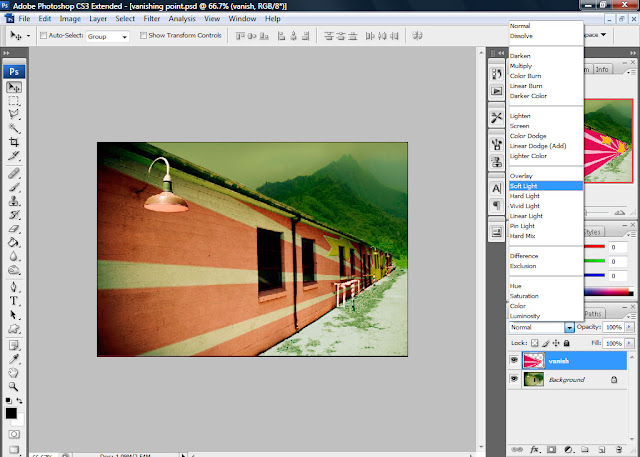
Step-4: Its my favourite part of the tutorials, change vanish layer mode to Soft Light and see the magic of vanishing point.


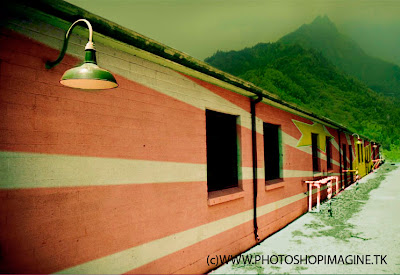
But there is some things in windows or light of wall that are not look good, like a red color on light, erase these things by using eraser tool or vector mask.


Thats we done!

Read more...

Friday, May 29, 2009

Changing Color Using Replace Color


There are the plenty of ways to change the color of pictures in photoshop. We are going to discuss one of them.
.Using Replace Color Tool
We are going to changing color of dress using Replace Color Tool.

Step1: Open a picture for changing color. I choose following picture. And make it duplicate by pressing Ctrl+j or going to Layer > Duplicate Layer & name this layer "Color" as u want.


Step2: After making a duplicate of picture, go to Image > Adjustment > Replace Color.


The following dialogue box will be apear:


Step3: We are going to change the color of dress. So Click any where on the dress by Eyedropper.


After that click to selection radio button in Replace Color Dialogue box than it will appear as:


After making changing in Hue you can see that in the some area color of dress is not change as shown:


Step4: Now what to do select the "Add to Sample" EyeDropper and move to the dress area which is not selected and click it, its add color to it. We can also remove color using "Subtract from Sample" Eyedropper.


Step5: Our picture is ready.


The Replace Color Tool is very good to changing Dress color, Bike color and much more other things. Later on we are discuss the other ways of changing color, so stay with www.photoshopimagine.tk.


Read more...

Friday, May 15, 2009

Soft Focus Effect


This tutorial will show you how to apply Soft Focus Effect to a photo.

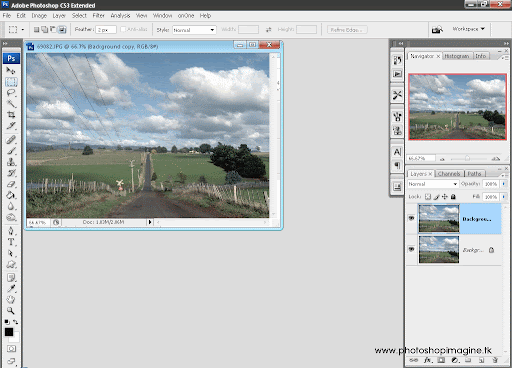
Step 1: Choose any picture on which you want to apply soft focus effect.

I choose following picture.Open this picture in photoshop.


Step 2: Make the duplicate of background layer,Goto Layer > Duplicate Layer

or

select background layer press Ctrl+j.


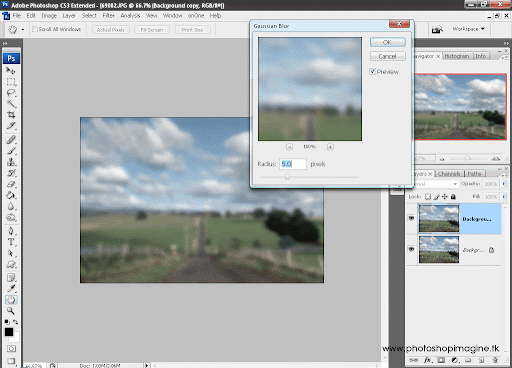
Step 3: Apply Gausian Blur to Background Copy.

Select the Background copy layer.
Goto Filter > Blur > Gausian Blur and set it 5.


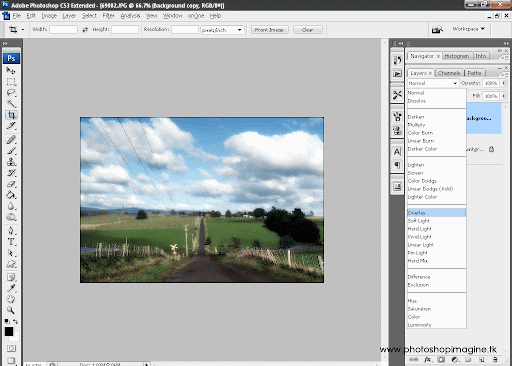
and change its Blend Mode to overlay.


Step 4: You can stop here. But if u want to put nice effect than use adjustment layer.

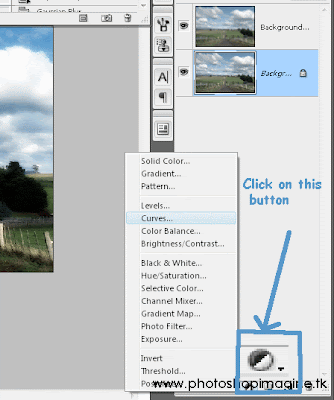
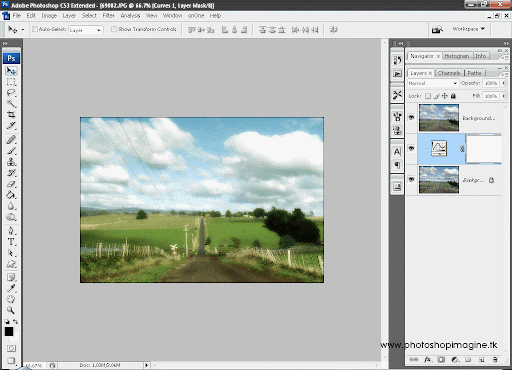
We need to add adjustment layer above the background. Select the background, and than click the Create new fill or adjustment layer button and than Select the curves option.


When you click to curves option than curves dialogue box will appear.

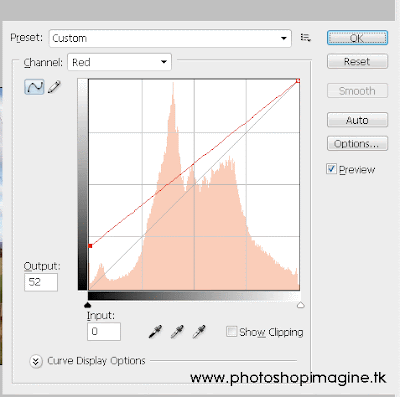
Now change its channel to RED instead of RGB, and apply following settings


next

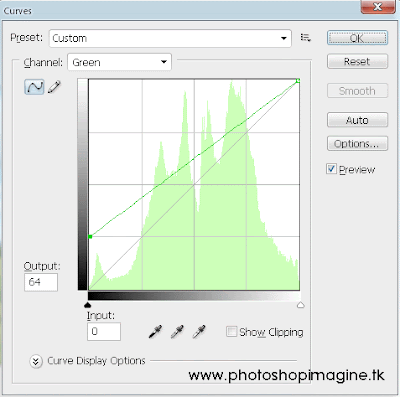
change channel to green and apply following setting than ok.


Thats we done.


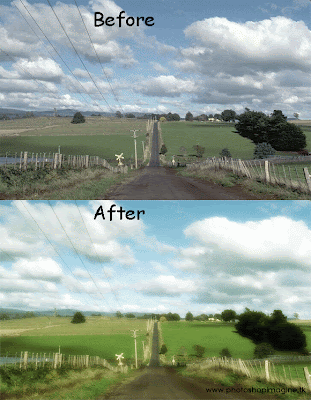
Now see the different between original image and after applying the soft focus effect.


The main benifit of this tutorial is that you can use this with any picture. So lets start to apply soft focus effect to your picture.

Read more...

Thursday, May 14, 2009

Dream Night Scene


This tutorials will show you how to create a dream night scene. You can create a number of scenes using this tutorials.

Sources used:
http://www.sxc.hu/photo/1129289
http://www.fotosearch.com/bigcomp.asp?path=RBL/RBL007/b01431.jpg
http://www.fotosearch.com/PSK005/1574r-23188/
http://i44.tinypic.com/ftmt1d.jpg
http://www.istockphoto.com/stock-photo-2074571-faith.php

In this we're using the channels to mask a few things.
Step1: Create a new document.


Step2: Now insert the tree image into your document as shown


Step3: By selecting the tree layer go to channels, duplicate the blue channel and then press Ctrl+L to modify the levels. Apply setting as shown.
Note: In these setting we try to make tree background more white. This method is very efficent to cut the pictures like trees or others that have sky in their back.


Step4: Now move to next step, press Ctrl+I to invert the black with white, then press Ctrl+click on the Blue copy channel thumbnail to select it.


Step5: Now click on the RGB channel in the channels menu, and with your selection still active click on the layers and add layer mask to tree layer as


Magically our tree is masked!!
To make a smooth selection applying a gaussian blur to the mask layer.
Go to Filter->blur->Gaussian blur and set as


Step6: Staying on the layer mask of the tree layer, pick up a big black brush, set the hardness to 90% and erase the parts you don't want.


Step7: Now the tree is ready. Right click on the layer mask -> apply layer mask. You can save this as a brush and as a shape! A tree can always be useful in the future.


Step8: Now its time to use other source file. First open bridge image.You can adjust its size on your document by pressing Ctrl+T. Cut it in same way in we cut the tree, read step 2 to 8.


Step9: Next, use joy man image, again use same method of channel to mask layer. Delete everything that you don't want in image.


Step10: Now use the bicycle boy images, again use same method .


Step11: After that lets we make grass. To make a grass first create a new layer by going to Layer > New > Layer or Ctrl+Shift+N and name it grass. Click to the brush tool. Now click to the brushes and choose grass brush as


we also need to change the setting of brush as making change in Shape Dynamics and Scattering setting as shown:


lets start making the grass by set brush diameter to 132px and make as u seen in the Dream Night Picture ..


Move your brush left to right as shown in picture. To make it dark move many time. To make the grass smooth apply filter > blur > gausian blur of 1.5.


Step12: In this step we place cut pictures into their proper position. first selectd tree layer, press Ctrl+u and set lightness to 0. Its make the whole picture totaly black with no colors. And adjust it on document using Edit > Transforms > scale.


Using this way insert all pictures into their proper position.


Step13: In this step we make the sky. First ctreate new layer above the background and named it sky.
Choose two colors #000000 and #f90023. Now select gradient tool and applyit as:


Now insert image sky into document and set it as.


Make it black by Image > Adjustment > Black & White or by Image > Mode > Grayscale.


Than Ctrl+L to make its contrast more highlight apply following setting.


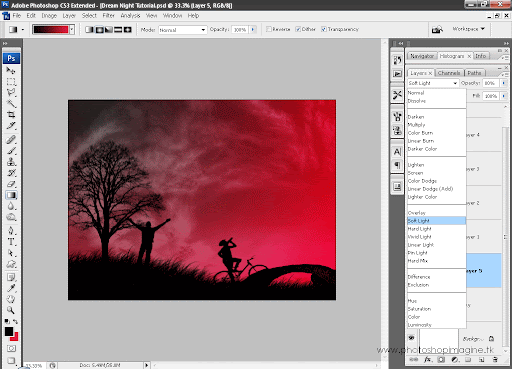
Set sky layer to softlight and opacity 80% and see that


Step14: We now going to create moon.Now make new layer and named it moon. Select Brush tool with white color and set its diameter 230px and hardness 70% and draw it..


and now right click to moon layer,select blending options and set its Outer and Inner Glow setting as


Step15: That is last step. Its give the picture realy a nice effect. Press Ctrl+A to select all and then Ctrl+Shift+C to copy all the layers and Ctrl+V to paste it and than Ctrl+j to make its duplicate copy.


To the duplicate copy apply the overlay and opacity 50%.


Than to the copy layer apply gausian blur 5 and opacity 50%.


Thats we done the Dream Night Scene is make. Use your imagination to create more nice project.

Read more...